



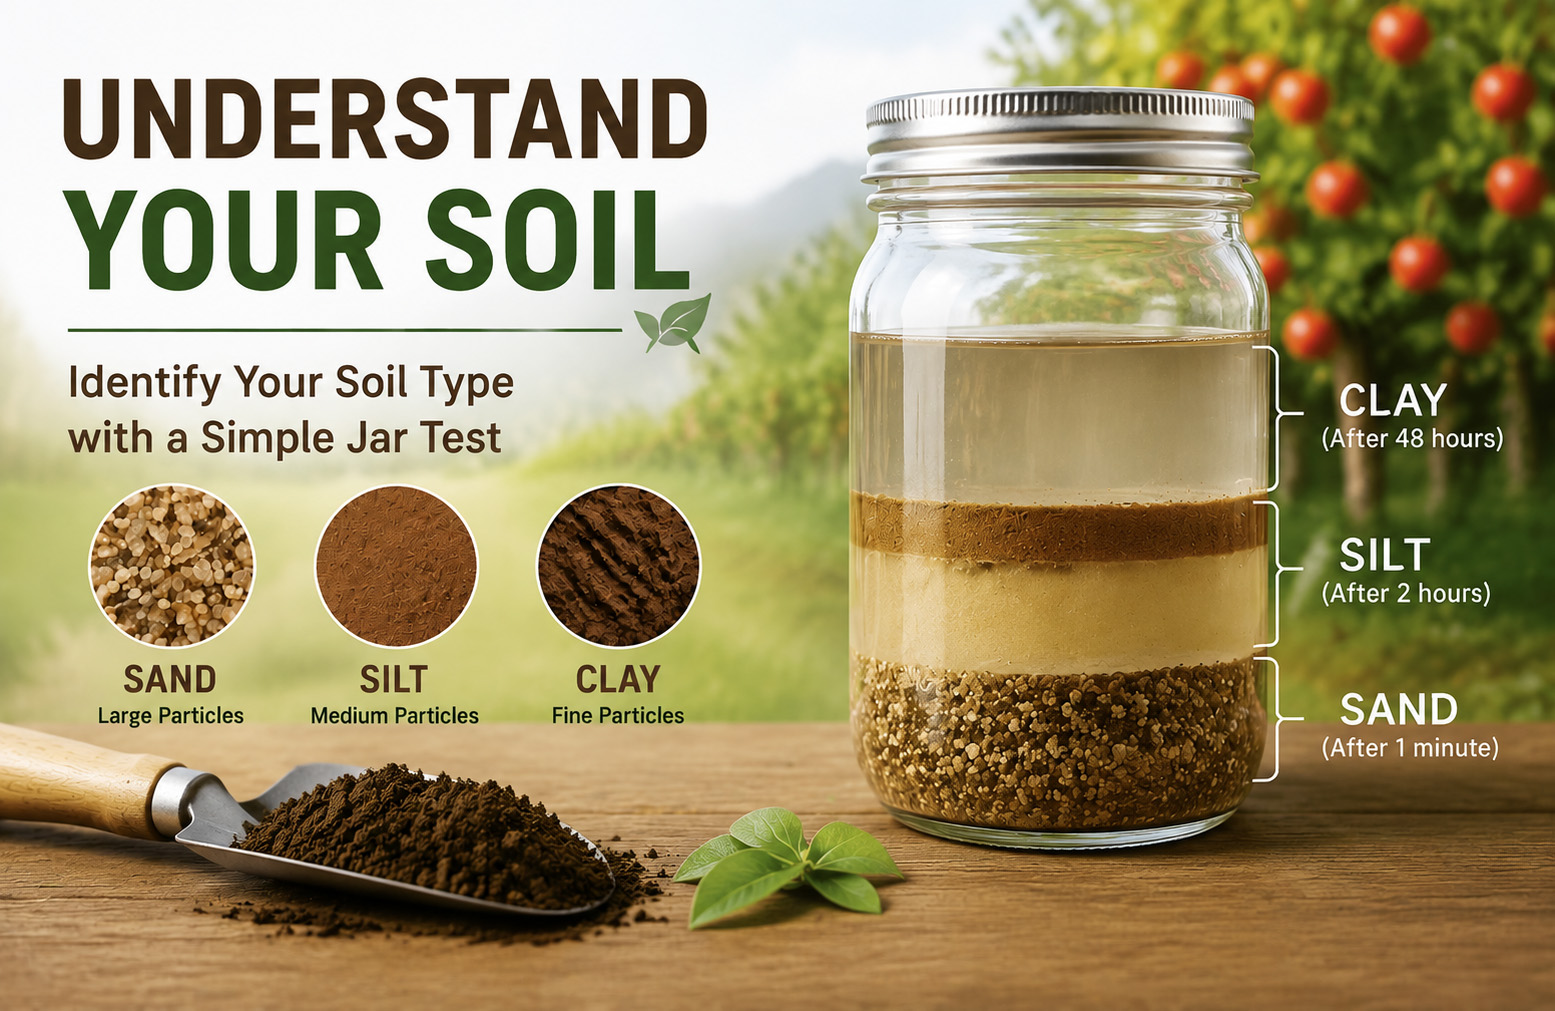
Knowing your soil type is one of the first steps toward understanding how your orchard behaves. Soil determines how water moves through the root zone, how much moisture can be retained, how easily roots can grow, and how nutrients are held and supplied to the tree.
Every orchard has its own combination of mineral particles and organic matter. The relative proportion of sand, silt and clay determines its soil texture, and understanding that texture can help you make better decisions about irrigation, drainage, soil management and orchard establishment.
The good news is that you don’t always need sophisticated equipment to get a first idea of your soil texture. A simple soil jar test can help you separate the major soil particles and estimate their relative proportions.
What are the main types of soil?
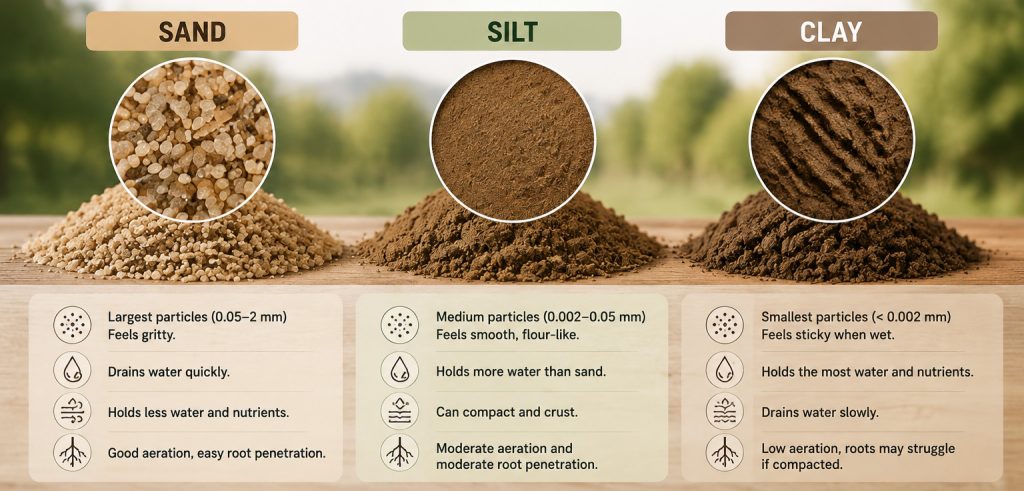
Soil texture is determined primarily by the proportion of three mineral particles: sand, silt and clay.
Sand
Sand consists of the largest of the three particles. Sandy soil generally feels gritty between your fingers and allows water to move through it relatively quickly.
This means sandy soils usually have good drainage and aeration, but they may hold less water and fewer nutrients than finer-textured soils. In an orchard, sandy soil can therefore require closer attention to irrigation and nutrient management.
Silt
Silt particles are smaller than sand and generally give soil a smooth or flour-like feel when moist. Silty soils can hold more moisture than sandy soils while still providing reasonable drainage.
However, silty soils can be susceptible to compaction and erosion if they are poorly managed.
Clay
Clay contains the smallest mineral particles. When wet, clay-rich soil tends to feel sticky and can be moulded into different shapes.
Clay soils can hold considerable amounts of water and nutrients, but when poorly structured or compacted they may drain slowly and have limited air movement. This can create difficult conditions for roots.
What is loam?
When sand, silt and clay occur in a favourable combination, the soil may fall into one of the loam texture classes.
Loam is often considered desirable because it can provide a useful balance between drainage, moisture retention and aeration. However, there is no single fixed recipe for “loam”; several texture classes fall within the broader loam group.
It is also important to remember that soil texture is not the same as soil health. A loamy soil can still be compacted, poorly drained, low in organic matter or chemically unsuitable for a particular crop.
How to identify your soil type
There are several ways to determine soil texture.
A laboratory can measure particle-size distribution accurately. For a quick field assessment, growers can use the feel method, where a moist soil sample is examined by hand for its gritty, smooth or sticky characteristics.
Another simple method is the soil jar test.
The jar test separates the soil particles according to how quickly they settle in water. Sand settles first because its particles are larger and heavier. Silt settles next, while the much finer clay particles take considerably longer to settle.
Once the layers have formed, you can measure them and calculate the approximate percentage of sand, silt and clay in your sample.
The Soil Jar Test
The jar test is a simple way to estimate the texture class of soil from an orchard or planting site.
The method described here follows the original Orchardly Soil Guide. It is intended as an approximate field test and may underestimate the actual clay content, particularly if the soil particles are not completely dispersed.
What you will need
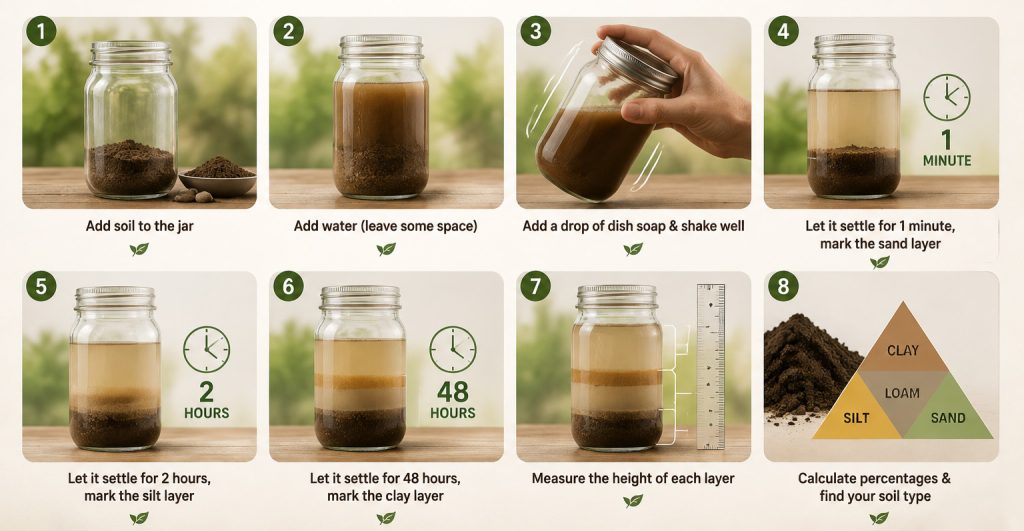
You will need a clear, straight-sided jar, a permanent marker, a ruler, a watch or stopwatch, a mesh sieve or old colander, clean water and approximately one tablespoon of powdered dishwashing detergent.
Choose a jar large enough to leave some space above the soil and water so that you can shake the mixture thoroughly.
Step 1: Prepare the soil sample
First, pass the soil through a mesh sieve or old colander to remove stones, roots, leaves and other large pieces of organic material.
Fill approximately one-third of the jar with the prepared soil.
The quality of your sample matters. If you are testing an orchard, take soil from a representative area rather than from a single unusual spot.
Step 2: Add water
Fill most of the remaining jar with clean water, leaving some space at the top.
The empty space is important because you will need to shake the mixture vigorously.
Step 3: Mix the soil
Add approximately one tablespoon of powdered dishwashing detergent.
Close the jar securely and shake it vigorously until the soil becomes a relatively uniform slurry.
The purpose of this step is to separate the soil particles so that sand, silt and clay can settle independently.
Place the jar on a level surface once mixing is complete.
Step 4: Mark the sand layer
Start your stopwatch.
After approximately one minute, the larger sand particles will have settled at the bottom of the jar.
Use your marker to mark the top of this first settled layer.
This is your sand layer.
Step 5: Mark the silt layer
Leave the jar undisturbed on the level surface.
After approximately two hours, mark the top of the next settled layer.
This represents the silt layer.
At this stage, the sand will already be at the bottom, with the silt forming the layer above it.
Step 6: Mark the clay layer
Leave the jar undisturbed for approximately 48 hours.
The finest particles will gradually settle above the silt.
Mark the top of this final settled layer.
This is the clay layer.
You should now be able to see three main layers:
Sand → Silt → Clay
The appearance of the layers may vary depending on your soil and how thoroughly the sample was dispersed.
Measure the soil layers
Once the layers have settled, use a ruler to measure the height of each layer.
Record: Height of sand layer, Height of silt layer, Height of clay layer
Then calculate the total height of all three layers.
For example, if your total settled soil is 10 cm and the layers measure 5 cm sand, 3 cm silt and 2 cm clay, you can calculate the approximate percentage of each fraction.
Percentage of sand: Sand height ÷ Total layer height × 100
Percentage of silt: Silt height ÷ Total layer height × 100
Percentage of clay: Clay height ÷ Total layer height × 100
The three percentages should add up to approximately 100%.
Use the Soil Texture Triangle
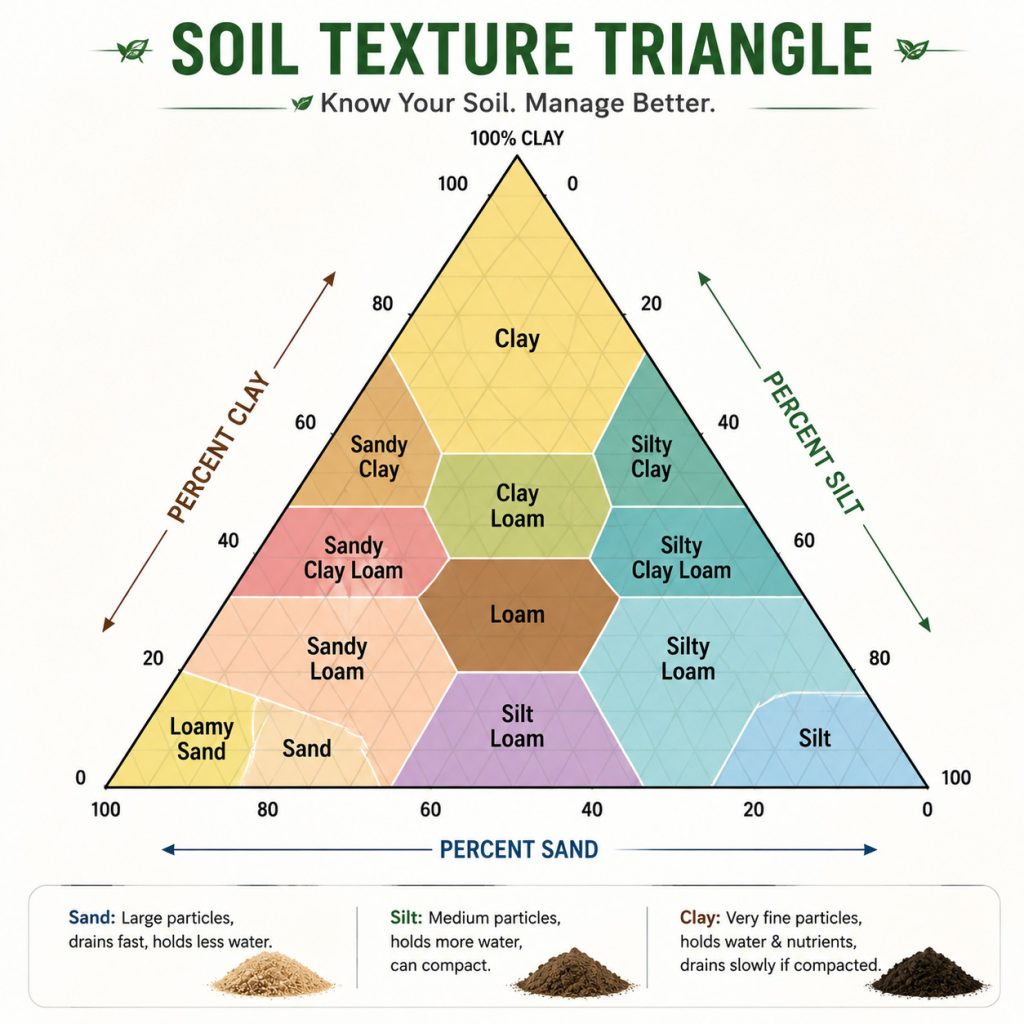
Once you have your percentages, the next step is to determine the soil texture class using a soil texture triangle.
The triangle contains regions representing different texture classes, such as sandy loam, loam, silt loam, clay loam and clay.
To use it, locate your measured percentage of clay, silt and sand on the appropriate scales and follow the corresponding lines into the triangle.
The point where the three lines intersect indicates the approximate texture class of your soil.
For example, if your measurements fall within the loam region, your soil would be classified as loam.
How accurate is the jar test?
The jar test is useful because it is inexpensive and easy to perform, but it should be treated as an estimate rather than a laboratory analysis.
One of the main limitations is that clay particles can stick together, or flocculate, and settle along with larger particles. If this happens, the clay fraction may be underestimated.
The original Orchardly method notes that more thorough dispersion can improve the result, while laboratory methods use instruments such as a hydrometer to determine particle-size distribution more accurately.
So, use the jar test to understand your soil, but don’t use it as a substitute for a proper soil laboratory analysis when making important orchard management decisions.
What does your soil type tell you?
Knowing your texture gives you an important starting point.
A sandy soil is likely to drain quickly and may require more careful irrigation and nutrient management.
A clay-rich soil can hold more water and nutrients but may require greater attention to drainage, aeration and compaction.
A silty soil may have good moisture-holding capacity but can be vulnerable to compaction and erosion.
A loam or loam-related texture may provide a useful balance of water retention and drainage, but its actual performance still depends on structure, organic matter, compaction, pH and other soil properties.
In other words, the soil texture tells you how your soil is likely to behave. It does not tell you everything about its fertility or health.
From a Simple Jar Test to Better Orchard Management
The jar test is a good first step because it helps you understand the physical foundation of your orchard soil.
But texture is only one part of the picture. Once you know whether your soil is sandy, silty, clayey or loamy, the next step is to understand its structure, drainage, organic matter, pH, EC and nutrient status.
That is where proper soil testing becomes important.
Know your soil texture. Test your soil. Then manage your orchard based on what the soil is actually telling you.
For growers using Orchardly, soil-health testing and orchard-specific data can take this process further by helping connect soil information with practical crop and nutrient-management decisions.
Frequently Asked Questions
What are the three main soil particles?
The three primary mineral particles are sand, silt and clay. Their relative proportions determine soil texture.
What is the easiest way to identify soil type?
A hand-feel test can provide a quick estimate, while the jar test provides a simple way to estimate the relative proportions of sand, silt and clay.
How long does the soil jar test take?
The complete test takes approximately 48 hours, because the finest clay particles need much longer to settle than sand and silt.
What settles first in a soil jar test?
Sand settles first, followed by silt and then clay.
How do I calculate soil texture percentages?
Measure the height of each layer and divide it by the total height of all three layers, then multiply by 100.
Is the soil jar test accurate?
It provides an approximate estimate. It can be affected by incomplete dispersion of clay particles and other factors, so laboratory analysis is more accurate.
What is the soil texture triangle?
The soil texture triangle is a classification tool that uses the percentages of sand, silt and clay to determine the soil’s texture class.
Is loam the best soil for fruit trees?
Loam and related textures can provide a favourable balance of drainage and water retention, but texture alone does not determine whether soil is suitable for a fruit orchard. Root-zone depth, drainage, structure, pH, salinity and nutrient status also matter.
Should I get my orchard soil tested?
Yes. The jar test can tell you about texture, but a laboratory soil test can provide information about chemical properties and nutrient availability that the jar test cannot measure.